Here is the finished video, again there is a 10 second black clip:
Monday 4 June 2012
Completed Video
I really hope that this will be the final time I have to upload this video! I'm really pleased with the finished outcome and think that by changing the font and adapting some of the text and moving a few clips has been really beneficial to the finished product. I believe that now the music fits better and that it looks like it could be an actual advert for Lego. I'm particularly pleased with the outcome and hope that it reflects the journey i've been on over the last 9 months!
Here is the finished video, again there is a 10 second black clip:
Here is the finished video, again there is a 10 second black clip:
Sunday 3 June 2012
Testing & Comparing Fonts
So i've spent the day trying to match up the font from Lego's most recent advert to one that i can use within mine, I tried to google what font they use in their adverts and turned up no results that were of any use!!
Heres a screen shot of the font they use:
After scrolling through my complete collection of fonts these five fonts were the closest i could find to the lego one:
 |
| This font is Al Bayan, I believe it is close but not quite right! |
 |
| This is a font called Apple Braille, again I think it looks similar to the original Lego font but not exactly right! |
 |
| This font is Gujarati MT, close but not similar enough! |
 |
| This font is ST Heiti, it is not close enough for me to use though! |
 |
| This is the font that I have found to be the closest, and I plan to use in the final edit. It is called GB18030 Bitmap. |
Friday 1 June 2012
Feedback
I have shown the advertisement to a variety of different people and had virtually the same feedback from the all. Which is that the that the text at the end is not quite right, and i agree.
Here is what the text at the end looks like:

I agree with the feedback that I received and want to put it right, i believe that the problem lies in the font and the transition. Therefore I plan to look at other lego adverts again and match the text up.
As well as the feedback about the text, i also received very good feedback from people, they said that the advert was very good and looked as if it could be seen on the television. I am very pleased with the feedback and feel if i can overcome the issue with the text it will be a very good piece of stop motion.
Here is what the text at the end looks like:
I agree with the feedback that I received and want to put it right, i believe that the problem lies in the font and the transition. Therefore I plan to look at other lego adverts again and match the text up.
As well as the feedback about the text, i also received very good feedback from people, they said that the advert was very good and looked as if it could be seen on the television. I am very pleased with the feedback and feel if i can overcome the issue with the text it will be a very good piece of stop motion.
Thursday 31 May 2012
Finished edit!!
I'm happy to announce that I have finished the editing of the final advertisement! I am so pleased with the final outcome of the video, and think it reflects everything I have planned over the past couple of months since deciding to use lego! I want to show damien, my FMP tutor the finished piece and see what he says, before officially putting it to one side ready for the show case in two weeks time.
Here is the finished video (Theres a 10second black clip before it begins):
Monday 28 May 2012
Cheeky Preview
I have uploaded 3 individual videos of my stop motion and time lapse lego creations, they are not how they will be appearing in the advertisement they are just the basic stop motion then time lapse videos. I have decided to upload the pirate ship and desert island, (Note, none of the videos have sound as i am in the process of sorting the music at the moment!!):
The Lego Sign:
And the Shop:
I have chosen these as i think they all demonstrate well the theme of the advert and are all different sorts of things that feature in the advert. As the deadline is fast approaching i thought i'd check in and say that there is just the music to go on now and hopefully my final video will be up by the end of this week!
Hope you enjoyed these sneeky videos and keep on checking to see when the final one is up!!!
Saturday 26 May 2012
Editing Stop Motion with Final Cut Pro
- Final Cut Pro lets you set a default video size for imported images. We need to set things so that an image is imported to play as 3 individual video frames. This will give us a playback frame rate of 10fps. You can change this number to affect the playback frame rate, but will need to re-import your folder of photos at the new duration if you change it. To set this import size go to the top menu and select user preferences from the Final Cut Pro menu.

- Select the editing tab (second item) in the user preferences and change Still/Freeze Duration to 00:00:00:03. Click OK.

- Import the folder of images. These should be sequentially named and 720X480.


- Double click the imported folder of images. Select all (Edit>Select All) of the images. and drag them to the timeline.

This information is taken from: http://mediacommons.psu.edu/instruction/tutorials/importing-still-images-stop-motion-animation-final-cut
I have found it particularly important when importing images to use this process that I found online, as it makes the editing process much easier when putting clips onto the timeline. Not only does it save time but also means I can immediately start editing with the clips rather than having to wait for each one to render ect.
Monday 21 May 2012
Update!
So I'm feeling as if I should check in with my progress!
I'm not currently at a point where I can upload a video, however I am in the process of editing my final advertisement, Im really happy with the way it looks and really feel it demonstrates my storyboards and visions I had of the advert!
Here are some cheeky pictures from the shoot for a sneaky preview of what the advert entails:


Thursday 17 May 2012
Filming
A week and a half ago I did some practices with my lego mixing it up and playing around with stop motion. I literally was testing out the technique before my filming date last week, so there was no focus on the lighting camera work ect, so as expected there were obvious lighting issues and focus issues in editing but as I was only testing the technique these are not a problem. Here is the video:
Here's are some problems that I found whilst making the video, and in red are how I plan to overcome them:
A. Movement in the objects.
- I've purchased a baseplate, in which I will blue-tac down and build each object on, therefore eliminating any movement.
B. Time.
- As stop motion is a very time consuming process, I've decided to enlist some help when shooting my final video. I have already asked a friend who has agreed to be my 'button pusher' for the shoot, therefore I can focus on the objects and not have to keep running back and forth from the camera.
C. Sturdiness of the objects.
- I will need to rebuild some of my objects to ensure they are more sturdy for the final shoot, as during my tester I had some trouble with lego falling apart as i was trying to build up, and this slowed up the process a lot.
Tuesday 8 May 2012
Storyboarding
Here are my storyboards for my FMP: Lego Advertisement.
I will be constantly referring back to these during the shoot to ensure I get everything I need for the advert, I have planned to combine stop motion and time lapse as it believe it works well together but also because it is something that Lego does in their adverts. Here is the storyboard:
Storyboarding
Pre-Production Paperwork
Here is my pre-production paperwork for the upcoming shoot tomorrow. I will be referring back to this when setting up my shoot to ensure it looks the way I have planned and get everything I need!
Call Sheet
Location Report
Shooting Order
Equipment List
Production Schedule
Risk Assessment
Call Sheet
Location Report
Shooting Order
Equipment List
Production Schedule
Risk Assessment
Monday 7 May 2012
More Creations
Over the weekend I have booked out the studio to shoot my final advert, this will be taking place on Thursday 9th of May 2012, that will give me plenty of time to edit before the hand in date on the 24th of May. I have also purchased another large box of lego and built some more little pieces for my advert:


Friday 4 May 2012
My Idea
I've had an idea to create an advert for lego, im going to mix up time lapse with stop motion as I have found out that this is what Lego does a lot when creating videos and commercials!
I have created some different objects out of lego that I plan to build in the advert, here are some pictures of things I have made:


I have created some different objects out of lego that I plan to build in the advert, here are some pictures of things I have made:


I am really happy with my little creations, however as talking with one of my tutors we decided that I will need to build some more characters and objects to ensure I have enough to fill the advert time, therefore I will build some more over the weekend.
Tuesday 1 May 2012
Lego Stop motion Videos
I've looked on the Lego YouTube channel to find out different adverts, and videos they have created using stop motion to get some ideas of what to make.
Thursday 26 April 2012
Time Lapse
It is said to be 'The key to Time Travel': Time-lapse photography!!
STEP #1: CHOOSE The SUBJECT
AN OVERVIEW
Alright, so it’s not time-travel. However all time-lapse photography is, really, is shooting photos of the same thing, spread out over a period of time, and editing them all together into one video that plays back in a shorter amount of time, which looks as though it is moving. So time lapse maybe showing something growing over a long period of time, like a plant or tree, or it could be a series of photos showing something being built, or it could even be something simple like watching a city over the period of a day!
Time-lapse lets you see the natural progression of time, while not having to wait through the actual length of it.
Here’s an example of a time-lapse, it shows a seed rooting and growing out of the ground:
Created by 'newscientiststvvideo' http://www.youtube.com/watch?v=4BtKAkP5xOk
A few basic steps-creating a time-lapse film:
here are a few suggestions that I have found online for what Time-lapse could entail:
- Fruit rotting/ice melting
- Grass growing
- A cross-country drive
- Sunrises or sunsets
- A busy city street over a day’s time
- Opening of flower buds/nature
- Pregnancy
- A construction site
- A self-portrait-aging over a number of years
- Life cycle of a tree over a year’s period
- Baking in the oven
It obviously depends on the time span, it could be taken over a matter of minutes, hours or even years!
STEP #2: FIGURING OUT EVERYTHING
The length of the event: Work out how long it will take to shoot the event/subject, as somethings are going to takes years/months, and consider if there will be any intervals in the process. How smooth is the final video going to appear? These are the things that potentially need trialling before hand!
How the Final Movie Appears: The final video can end up two ways: blocky or smooth and seamless. With blocky, shots will seem to abruptly change into the next, so for example in a city time lapse, a person might appear in one part of the screen and then they'd suddenly appear halfway across the screen in the next frame.
Blending the interval shots together will make the video appears smooth and seamless. This can be done in two ways: drag the shutter speed when shooting, and shoot the subject more often using at shorter intervals.
STEP #3: SHOOTING STILL PHOTOGRAPHS
It really doesn’t matter what camera is used to shoot the photographs: SLRs, point-and-shoot cameras, and webcams.
Whatever is used, it's recommend to mount the camera on a tripod.
Set up the camera:
- Set the camera to record JPG, to save on space.
- Set your camera’s white balance to manual auto-white balance can change and fluctuate, especially if shooting something over a period of time, the light will get brighter or dimmer. Setting it to manual helps to ensure all of the photos have the same look.
- Set the camera’s exposure manually For most of the same reasons, take the camera’s exposure off automatic as well.
Sometimes there will be a batch of photos that need just a little tweaking before anything else. Maybe the exposure or levels could use some nudging.
- One quick tip: Automate Everything.
In Photoshop, practice on one photo from the bunch, adjusting it, then close the photo without saving, then use Photoshop’s Automate Batch command. Select the folder of photos and create a new folder for where the edited photos are going to go. Resulting in ending up with a batch of photos, all edited, ready to be put together!
STEP #5: START MAKING The video
Use any programme to edit the video, it could be imovie, windows movie maker, quick time, or final cut! Any editing software is appropriate. Then add music, titles and any other effects.
Information edited from:http://content.photojojo.com/tutorials/ultimate-guide-to-time-lapse-photography/
stop motion techniques
Stop-motion animation is an animation techniques.
Mix equal parts digital camera, computer, and imagination (you’ve got all three), and you’re on your way, Although flashier computer-generated animation is in vogue, stop-motion has a rich heritage of its own.
Almost anything can be used in stop-motion animation, there are many ways to go about shooting, editing and finalizing a stop-motion short.
AN EXAMPLE
Here’s an example of what you can do with stop-motion photography:
What's needed
The first thing:An idea. Try to stick with something simple, any action that can be split up into smaller parts works well.
It may be to make an inanimate object appear as though it is alive; for example, a sock inching its way across the floor or a piece of paper that crumples itself up. Keep in mind that you can expect to shoot around 10 photos for every second of film!
Second thing that will be required is a digital camera. Depending on the length of the video it may be advisable to “fill and dump” this is copying the photos to the computer and erasing the memory card multiple times before finishing.
Finally, in order to turn the images into an animated video video editing software like Apple’s iMovie/QuickTime Pro/Final Cut is necessary.
STEP 1: SHOOT the ANIMATION
Let’s say, for example, the video is of a sock moving itself across the floor. Start at the beginning: place the sock somewhere and take the first photo.
Using a tripod and only moving the object will make it appear as though the object is moving through the frame. Keeping the object in the same general area in each frame by moving the camera along with it will make it appear as though the camera is traveling with the object.
After taking the first photograph, move the sock slightly and take another photo. Move it again by the same distance, and take one more. Continue this process.
Think about manipulating the object in creative ways to add visual interest to the film, just make sure that whatever movement the object makes is done slowly over several frames.
Think about manipulating the object in creative ways to add visual interest to the film, just make sure that whatever movement the object makes is done slowly over several frames.
Finally, if there's a mistake while shooting, delete that picture on the camera and take another. This will save from having to edit your film later.
STEP 2: DOWNLOAD the PHOTOS
Now that the images have been captured, get them onto the computer. Put them all into one folder and name it.
STEP 4: ANIMATE the PHOTOS
In order for the animated short to play properly, tell the editing software how long you want each photo to appear before showing the next one. Like creating a slideshow, except instead of giving each image a few seconds, give it only a fraction of a second. The timing chosen will affect the overall tempo and length of the film.
For the sock example, it has a duration of 3 frames-per-photo.
Using the 3 frames-per-photo setting, its easy to estimate how many photos are needed to create a movie of a given length. Around 100 photos are for 10 seconds of video. To fine tune the animation, it can be slowed down by choosing to use more than 3 frames-per-photo.
FINAL TOUCHES: MUSIC AND SHARING
Add music to the short, and share the stop-motion video!!
That’s it! Don’t forget to save the project often.
Have fun, be creative and always EXPERIMENT!
INFORMATION EDITED FROM: http://content.photojojo.com/tutorials/stop-motion-digital-camera/
Suitable Companies
I've made the decision to look at creating an advert, and have been thinking of lots of different products that may suit a stop motion advert, I think that I would like to use Lego as the focus however i will look at other companies as I believe it's important to explore all my options:
Kellogs: - Frosties
- Cocoa Pops
- Krave
- Honey Loop
- Pop Tarts
- Squares
Cadburys: - Dairy Milk
- Twirl
- Crunchie
-Bouneville
- Fugde
- Chocolate Fingers
Galaxy: - Maltesers
- Magic Stars
- Galaxy
- Starburst
- Ripple
Toys:
- Playmobile
- Lego
- Action figures: Barbie & Action man
- Vehicles
- Construction toys
Here are some adverts these companies have already done using animation:
Friday 20 April 2012
Post tutorial idea:
After my tutorial I was mulling over what we had discussed, and after doing some research it just didn't feel like the right direction, therefore I emailled Damien with an idea that I had been thinking of, here is the email I sent (click to enlarge it):
 I will be exploring more into this and will be ordering some Lego so that I can have a play around with some ideas and techniques......
Thursday 19 April 2012
Tutorial
With the deadline soon approaching, I have been feeling rather nervous that I am no closer to a final product. Therefore I decided to book in a tutorial with Damien, my FMP tutor and we discussed many different things, and came up with some ideas to make a time lapse video using recycled items, to show how to utilise these sorts of things in creative ways! Here is the follow up email:

Recycling....
During my tutorial with Damien I decided that I explore the idea of creating some sort of story or sequence using different sorts of recycled items...
So I've looked into different sorts of artwork where recycled items have been utilised....


So I've looked into different sorts of artwork where recycled items have been utilised....


All of these artists which I found off of google images, have used recycled items to create beauty, words and show their artistry. I think that all of these images are very beautiful and are very creative.
After searching for pictures I looked for videos using stop motion, there we're many 'ameture' style videos that were projects for schools ect. So I have chosen two that I think work well and are particularly effective:
I think that these two videos are particularly good as they tell a story and keep the viewers attention. I like the way that both are demonstrating recycling and promoting it, however if I were to create a video, I would want to use the items to create a scene rather than only promote recycling.
Tuesday 17 April 2012
Playing with Time Lapse
One of my tasks was to extend my stop motion and play around with time lapse! Unfortunately where i initially thought i could set up my camera to take a shot every few seconds, i was proven wrong as i require a special piece of equipment which allows my camera to do so. Therefore i had a look at my istopmotion programme, which does have a time lapse option, however is not compatitble with my camera!! Determined by this point to shoot the video, i set up my MacBook pro with the istopmotion programme and used the inbuilt HD camera to do it! I set it up to take a picture every 5 seconds, the video is very short and just shows me building a wooden dinosaur......
I am happy with the outcome of this video, and actually really enjoyed making it! It is something that i would like to develop further but need to work out what camera i will need to use next time as my Canon EOS 1000d is slowly letting me down!!!
I am happy with the outcome of this video, and actually really enjoyed making it! It is something that i would like to develop further but need to work out what camera i will need to use next time as my Canon EOS 1000d is slowly letting me down!!!
Sunday 15 April 2012
Movement practice
I have created a video using a glass bottle to practice basic movement, i'd done some research on stop motion films, and found that to get accurate movement the key is to move the objects/characters 0.5mm at a time for swift movement!!
Basically in this video i've not focused on planning a background or scene, i've just got my camera and a household object and practice the movement! I've edited it to some music to make it a little more interesting:
I am quite happy with the outcome and feel it reflects smooth movement, there are a few jolty areas, but nothing that need immediate major improvement!
Thursday 12 April 2012
Armatures
Since having trouble with my plasticine stop motion video, I have looked at some advice people give online, about ways in which you can create a 'skeleton' for the characters called armatures:
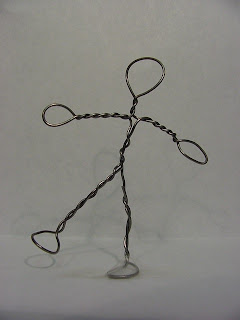
"Armatures are the support for your new creation. Basically it is the skeleton underneath the clay, which will allow you to move your character in small increments for animation.
The first step in creating your armature is to take your spool of aluminium armature wire, twist the wire until it looks loosely twisted. Do this as it makes the wire twice as strong, and also less likely to cause problems if one half the wire breaks during animation.
When adding the clay/plasticine, it is important to melt the clay onto the armature so it will stick to it, and not fall off during animation. I do this using a torch, but can be done using the double boiler to melt the clay. You melt your clay, and drip it onto the armature until you have a thin coating of clay over every part of the armature. You then wait for the clay to cool completely, and then apply your un melted clay on top of it. You can also sculpt the inner parts of your character using scrap clay, and then coat the outside of it with nice clean new clay."
Taken from: http://www.stopmotionanimation.com/handbook/19a.htm
Exploration of Stop Motion Videos
I've been looking online at some videos that have been created using stop motion and the following really stood out to me:
Saturday 7 April 2012
Searching online for Hints and Tips!
• Tip 1: NEVER bump the camera
Even the slightest accidental nudge of the camera will stick out like a sore thumb and scream "amateur!" to your audiences. Tying your camera's tripod down is a good way to avoid the effects of small bumps. Use some sort of 'video assist', whereby you can see the frame you shot last over-layer on the current one can help you spot a camera bump earlier rather than later.
• Tip 2: NEVER accidentally change the exposure of the camera
This is unavoidable with cheaper cameras with their auto-exposure, Setting the white balance correctly and consistently is also important. Indeed, keeping a logbook of the settings you used for a shoot is a great idea.
• Tip 3: NEVER accidently alter the focus of the camera
Again, modern lower-end cameras don't offer manual focus, and these are next to useless for stop motion. If you want to pull focus then having a plan to do so is a great idea. If you're able to numerically specify the focus setting for a camera, do so.
• Tip 4: NEVER bump the subject or the set
A good stop motion animator flows around the set like a gentle breeze. A tip here is to choose materials for your puppets and your sets that are forgiving of accidental encounters. For instance, use foam latex instead of modeling clay. Avoid using real hair for puppets, unless you can be absolutely sure that you won't flick it accidentally. If disaster strikes and you do accidentally move a puppet or a set element, you can attempt to reposition them, using the previously captured frame as a reference.
• Tip 5: NEVER accidentally change the lighting
The first thing to mention here is that natural light is your enemy, as lovely as it is. The problem with natural light is that it fluctuates over time. Clouds move overhead, and of course the sun is always in motion. The other thing to mention is that your own lighting setup shouldn't change either. For fixed lights (such as overhead lights in your office) make a note in your log about which are on, and for moveable lights, simply leave them where they are.
• Tip 6: ALWAYS attempt to shoot a scene in one session
A number of the issues mentioned above can be avoided by following this tip. Ideally when you embark on shooting a scene, you should be uninterrupted for as long as it takes to complete it. If you do need to stop for any length of time, (remember to eat, drink, and go to the bathroom!) then leave everything running. If you can only do so much in a single session, check that you've recreated the same conditions the next time before you start shooting in earnest, by capturing a test frame and comparing it with the last frame you shot.
• Tip 7: ALWAYS shoot more frames than you need
You can always delete frames, but creating them out of nothing weeks later is not so easy. An example of this is making your characters blink. I generally will add my eyelids to my character and capture a frame even when it would be too much to include them all. It's nice to be able to make that decision editorially, later. Another example of this is to take extra frames of the set without your characters, so that there's a 'blank field' to use later should you wish to remove a part of your character for whatever reason.
• Tip 8: ALWAYS try and capture things 'in camera'
Don't get me wrong-I LOVE computers and the synthesis of imagery, but the reality of stop motion is that if you have to 'fix' something in post, you'll need to do it for many frames. It's almost always worth spending the time beatifying your characters and your set beforehand.
• Tip 9: ALWAYS shoot as hi-res as possible
More pixels equals more options- you can choose to 'zoom in' on a part of your scene later, and of course when it comes time to producing the hi-res poster of your work you have more options. Also, you might only be making your stop motion film for Internet distribution now, but further down the track you may change your mind and decide that a hi-res digital projection is more your scene.
• Tip 10: ALWAYS test your setup before embarking on a shoot
For anything but the simplest of shots, it's a good idea to do a dry run-through, testing that the mechanics of the set and your characters are as you expect. Shooting stop motion photography can be like driving down a one-way street- there's no turning back!
http://www.stopmotioncentral.com/articles-6.html
Friday 6 April 2012
Advertisement: Stop motion.....
Still being drawn to stop motion advertisement campaigns i decided to look at whats new out there at the moment:
There are many adverts that use stop motion however I chose these as they stood out to me most, the adverts all demonstrate different types of stop motion and are all for different products.
Monday 2 April 2012
Childrens Safety Videos
I've been looking at some different sorts of safety videos for children using animation and have found none that use stop motion, nevertheless, here are some I have found:-
I've been thinking of some things that could feature in safety videos for children:
- Don't Play with Fire
- Don't talk to strangers
- Crossing the road
- Playing safely
- Don't play with sharp objects: Knives.
- Anti-bullying campaign
Although I believe there is a gap in the market for a stop motion safety video for children, it is not the route that i want to take, I do not believe it will benefit me to trial this video as I feel I can be putting the effort into another area of my project. If I had more time, and ideas for this video I would investigate more into it, I just don't believe that i have enough 'passion' in the subject to create this. I want to make something fun and exciting that creative and shows what I can achieve as an animator and producer.
Sunday 1 April 2012
FMP tutorial notes
After meeting with Damien, my FMP tutor, and showing him the videos that I have been creating since i last met with him two weeks ago, we have now set some new tasks for me to complete:
1. I am going to try different forms, for example Lego, it will be simplistic maybe just building it up and down again. Most likely this will be for an advert.
2. My next task will be to try and develop the ssmoothness of characters and pieces, i will start this by picking different forms and just moving them across the screen, it will be strictly about the movement so i will not be creating backgrounds or story lines.
3. As stop motion is usually aimed at children i am going to try to design and create something specifically for a target audience – maybe like a public information type sequence 'dont play with fire' 'dont talk to strangers ect'
4. I will try some sort of time lapse, even if that means having my hands in frame developing a character or story.
5. Finally alongside all of this i will ensure that I keep researching into different stop motion, exploring movies as well as stories and adverts.
Subscribe to:
Posts (Atom)